Megan Blake
Fastening a motorcycle helmet correctly is crucial for rider safety. To ensure proper fit and security, begin by placing the helmet on your head so that it sits comfortably without being too tight or loose. Next, locate the chin strap and adjust it to fit snugly under your chin, with enough room to accommodate one finger for comfort. Then, secure the strap by fastening the buckle, which is typically located either under the chin or on the side of the helmet. Finally, give the helmet a gentle tug to ensure it is securely fastened and will not come off easily in the event of an accident.
Explore related products


What You'll Learn
- Choosing the Right Helmet: Select a helmet that fits snugly, covering the forehead and sitting above the eyebrows
- Positioning the Helmet: Place the helmet on your head, ensuring it's level and not tilted forward or backward
- Securing the Chin Strap: Fasten the chin strap securely, adjusting it so it's tight enough to stay in place but not too tight
- Checking the Fit: Move the helmet side to side and up and down to ensure it stays in place and doesn't shift
- Final Adjustments: Adjust the helmet's ventilation and visor as needed for comfort and visibility before riding

Choosing the Right Helmet: Select a helmet that fits snugly, covering the forehead and sitting above the eyebrows
A well-fitting helmet is crucial for both comfort and safety when riding a motorcycle. To ensure you select the right helmet, start by measuring your head circumference with a flexible tape measure. This measurement will help you choose the correct size. When trying on helmets, make sure the chin strap is fastened securely and the helmet sits snugly on your head without any gaps. The helmet should cover your forehead completely and sit just above your eyebrows, providing maximum protection in case of an accident.
It's important to note that helmet sizes can vary between manufacturers, so always try on helmets before purchasing. Additionally, consider the type of riding you'll be doing, as different helmets are designed for different purposes. For example, a full-face helmet offers the most protection but may be less comfortable for long rides, while an open-face helmet provides more ventilation but less protection.
When selecting a helmet, also consider the weight and material. A lighter helmet can reduce neck strain during long rides, while a helmet made from high-quality materials will offer better protection and durability. Finally, make sure the helmet meets safety standards set by organizations such as the Department of Transportation (DOT) or the Snell Memorial Foundation.
In summary, choosing the right helmet involves considering factors such as size, fit, type, weight, material, and safety standards. By taking the time to select a helmet that fits snugly and meets your specific needs, you can ensure both comfort and safety while riding your motorcycle.
Top Spots to Sell Your Motorcycle Helmets: A Comprehensive Guide
You may want to see also
Explore related products


Positioning the Helmet: Place the helmet on your head, ensuring it's level and not tilted forward or backward
Begin by holding the helmet with both hands, positioning it in front of you at chest level. Gently place the helmet onto your head, starting from the forehead and allowing it to settle naturally around your skull. It’s crucial to ensure that the helmet sits level, with the front edge aligned just above your eyebrows and the back edge resting comfortably at the base of your skull. Avoid tilting the helmet forward or backward, as this can compromise its protective capabilities and obstruct your vision.
Once the helmet is in place, use your fingertips to adjust its position, making sure it’s snug but not uncomfortably tight. The helmet should move slightly with your head but shouldn’t shift excessively. If you encounter any discomfort or pressure points, reposition the helmet and try again. Remember, a properly positioned helmet is essential for optimal protection and comfort during your ride.
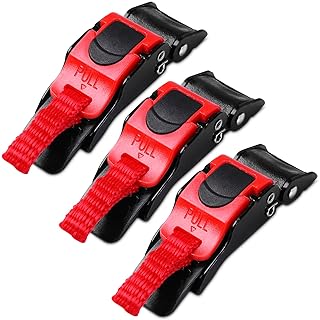
To further ensure a secure fit, engage the helmet’s retention system, whether it’s a chin strap, quick-release buckle, or ratchet mechanism. Fasten the strap under your chin, adjusting the tightness until you can fit one finger between the strap and your chin. This will provide a secure fit without causing discomfort or restricting blood flow.
Before hitting the road, perform a final check by gently tugging on the helmet to ensure it’s securely fastened. Additionally, make sure the visor is clean and clear, and that all ventilation systems are functioning properly. By following these steps, you can ensure that your helmet is correctly positioned and fastened, providing you with the necessary protection and comfort for a safe and enjoyable ride.
Boost Your Visibility: The Optimal Color for Your Motorcycle Helmet
You may want to see also
Explore related products


Securing the Chin Strap: Fasten the chin strap securely, adjusting it so it's tight enough to stay in place but not too tight
To ensure the chin strap of a motorcycle helmet is fastened correctly, begin by placing the helmet on your head, making sure it sits snugly and is level. The chin strap should be positioned under your chin, with the buckle centered and the strap running parallel to your jawline. Start by threading the strap through the buckle, pulling it tight enough to create a firm fit, but not so tight that it causes discomfort or restricts your ability to open your mouth.
Next, adjust the length of the strap by pulling on the loose end, ensuring there is enough slack to accommodate one finger for comfort, but not enough to allow the helmet to move around on your head. The strap should be tight enough to stay in place during normal riding conditions, but not so tight that it causes pressure points or chafing.
Once you have achieved the desired tightness, secure the buckle by snapping it into place. Make sure the buckle is fully engaged and that the strap is not twisted or kinked, as this can compromise the helmet's ability to protect you in the event of an accident.
It is important to note that the chin strap should be adjusted each time you wear the helmet, as factors such as temperature, humidity, and the presence of facial hair can affect the fit. Additionally, be sure to check the strap regularly for signs of wear or damage, and replace it if necessary to ensure the helmet remains securely fastened.
In summary, securing the chin strap of a motorcycle helmet requires careful attention to detail and a focus on achieving a balance between tightness and comfort. By following these steps and regularly checking the strap for proper fit and function, you can help ensure that your helmet remains securely in place, providing the protection you need while riding.
Top Spots for Scoring the Perfect Helmet: A Buyer's Guide
You may want to see also
Explore related products



Checking the Fit: Move the helmet side to side and up and down to ensure it stays in place and doesn't shift
To ensure a motorcycle helmet fits properly, it's crucial to perform the side-to-side and up-and-down movement test. This test helps confirm that the helmet is securely positioned on your head and won't shift during a ride, which is essential for both comfort and safety. Start by gently moving your head from side to side. If the helmet moves significantly with your head, it may be too loose. Adjust the fit by tightening the straps or using additional padding. Next, move your head up and down. The helmet should remain snug against your head without any substantial movement. If it shifts upward, you may need to adjust the chin strap or add more padding at the back of your head.
A well-fitted helmet should feel comfortable and secure, without any pressure points or areas of discomfort. It's important to note that different helmet models may have slightly different fitting mechanisms, so always refer to the manufacturer's instructions for specific guidance. Additionally, consider factors such as the thickness of your hair and whether you'll be wearing glasses or other accessories that could affect the fit.
Regularly checking the fit of your helmet is also important, as it can become loose over time due to wear and tear or changes in your head shape. Make it a habit to perform the side-to-side and up-and-down movement test before each ride to ensure your helmet is providing the necessary protection and comfort.
In summary, the side-to-side and up-and-down movement test is a simple yet effective way to check the fit of your motorcycle helmet. By ensuring a proper fit, you can enhance your riding experience and reduce the risk of injury in the event of an accident.
Rev Up Your Safety: The Ultimate Guide to Motorcycle Helmet Replacement
You may want to see also
Explore related products


Final Adjustments: Adjust the helmet's ventilation and visor as needed for comfort and visibility before riding
Before hitting the road, it's crucial to ensure your motorcycle helmet is not only securely fastened but also properly adjusted for optimal comfort and visibility. This often-overlooked step can significantly impact your riding experience and safety. Start by checking the helmet's ventilation system. Most modern helmets feature adjustable vents that allow you to control the airflow. Experiment with different settings to find the perfect balance between staying cool and reducing wind noise. Remember, excessive ventilation can compromise the helmet's protective capabilities, so avoid opening all vents simultaneously.
Next, focus on the visor adjustment. The visor should sit flush against your face without any gaps, providing a clear field of vision. Adjust the visor's angle to minimize glare and ensure it doesn't obstruct your peripheral vision. Some helmets offer a quick-change visor system, allowing you to swap out visors for different lighting conditions or to replace a scratched one. Familiarize yourself with this process to ensure a smooth transition when needed.
Consider the helmet's interior padding as well. It should fit snugly against your head without causing discomfort or pressure points. Over time, the padding may compress or shift, so periodically check for any signs of wear or misalignment. Replace the padding if necessary to maintain a secure and comfortable fit.
Lastly, pay attention to the helmet's overall weight and balance. A well-designed helmet should feel lightweight and evenly distributed on your head. If you experience any neck strain or discomfort during long rides, it may be due to an improperly balanced helmet. Consult with a professional to ensure your helmet is the right fit for your head and riding style.
By taking the time to make these final adjustments, you'll not only enhance your comfort but also improve your safety and overall riding experience. Remember, a properly adjusted helmet is just as important as a securely fastened one.
Essential Features to Consider When Choosing a Motorcycle Helmet
You may want to see also