Ryan Cole
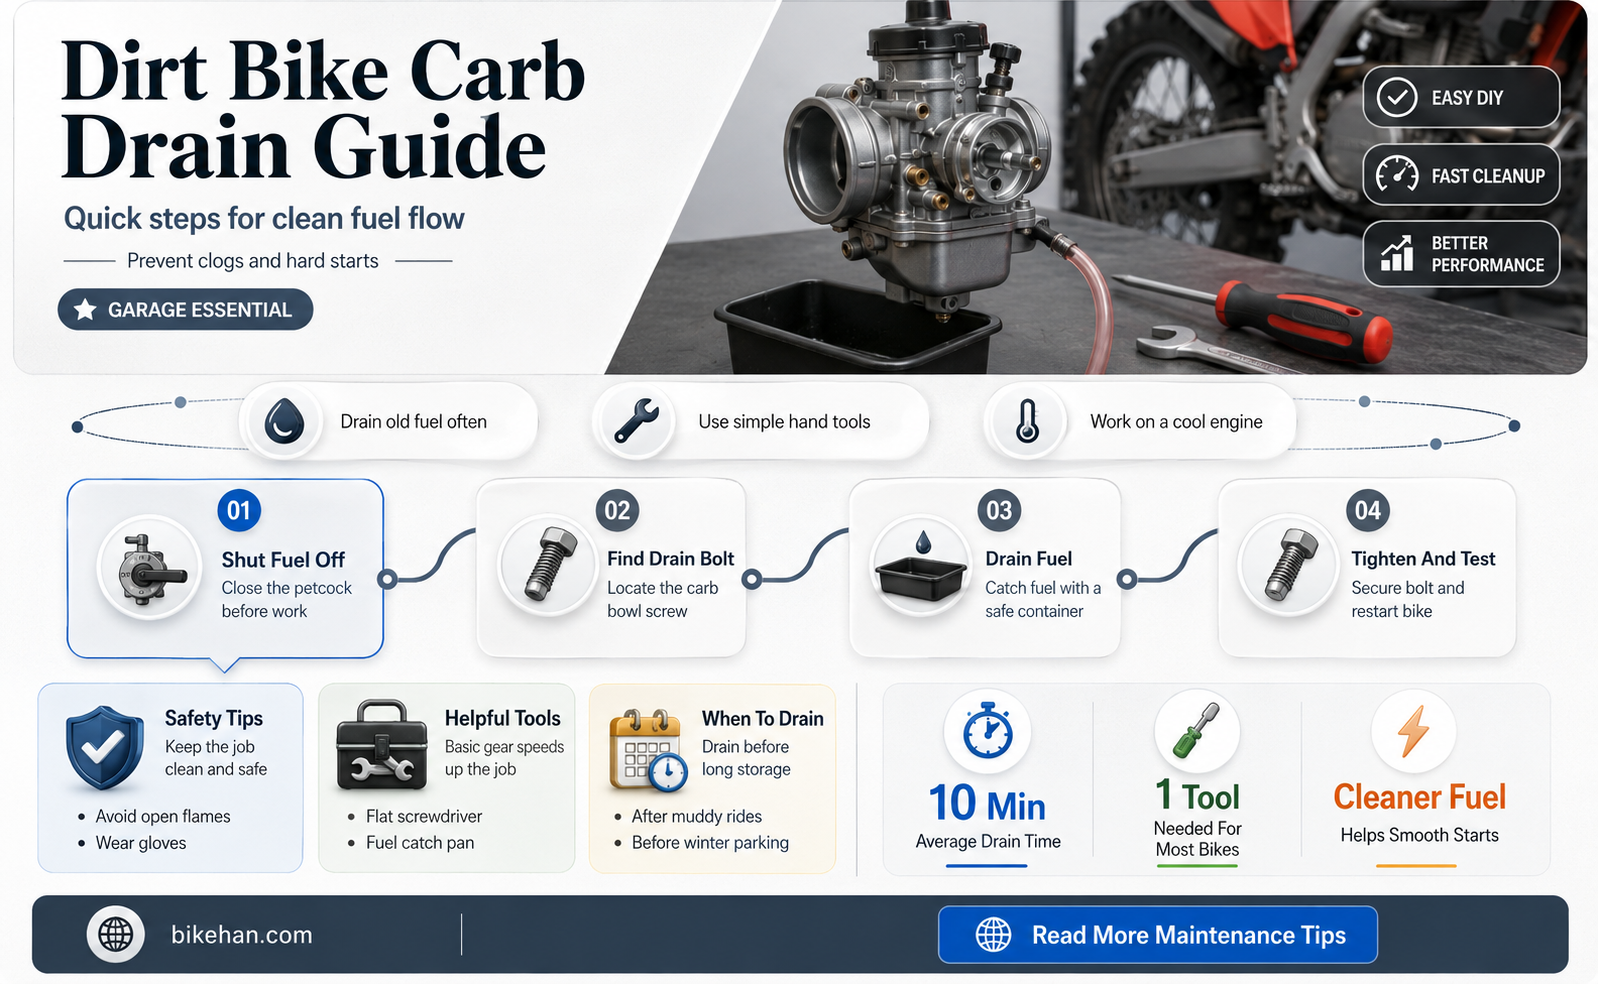
Draining the carburetor on a dirt bike is an essential maintenance task that helps ensure the longevity and optimal performance of the engine. Over time, fuel can accumulate in the carburetor, leading to issues such as flooding, poor starting, and rough idling. By draining the carburetor, you can remove any excess fuel and prevent these problems from occurring. This process is relatively straightforward and can be done with a few basic tools. In this guide, we will walk you through the steps to safely and effectively drain the carburetor on your dirt bike, helping you keep your machine in top condition.
| Characteristics | Values |
|---|---|
| Purpose | To remove fuel from the carburetor for maintenance or storage |
| Frequency | Recommended every 1-2 months or before storing the bike for an extended period |
| Tools Required | Screwdriver, wrench, pliers, drain pan, gloves, safety glasses |
| Safety Precautions | Wear gloves and safety glasses, ensure the bike is on a stable surface, avoid inhaling fumes |
| Step 1 | Turn off the fuel supply by closing the fuel tap or removing the fuel line |
| Step 2 | Remove the air filter cover and air filter |
| Step 3 | Locate the carburetor drain screw and remove it using a screwdriver |
| Step 4 | Allow the fuel to drain into a drain pan until no more fuel comes out |
| Step 5 | Replace the drain screw and tighten it securely |
| Step 6 | Reinstall the air filter and air filter cover |
| Step 7 | Reconnect the fuel line or open the fuel tap |
| Step 8 | Start the bike and check for proper operation |
| Common Issues | Clogged drain screw, damaged gaskets, fuel leaks |
| Tips | Use a clean drain pan to avoid contamination, dispose of drained fuel properly, consult the bike's manual for specific instructions |
| Estimated Time | 15-30 minutes |
| Difficulty Level | Beginner to intermediate |
Explore related products



What You'll Learn
- Preparation: Gather necessary tools and ensure the bike is on a stable surface
- Safety: Wear protective gloves and eyewear; disconnect the battery
- Access: Locate and remove the carburetor drain plug
- Draining: Allow the fuel to drain into a container; be cautious of spills
- Reassembly: Replace the drain plug and reconnect the battery; test the bike

Preparation: Gather necessary tools and ensure the bike is on a stable surface
Before you begin the process of draining the carburetor on your dirt bike, it's crucial to gather all the necessary tools and ensure the bike is positioned on a stable surface. This preparation step is often overlooked but is essential for a safe and efficient procedure. Start by assembling the required tools, which typically include a wrench set, screwdrivers, a drain pan, and possibly a new gasket if needed. Having these tools at hand will prevent unnecessary interruptions and ensure you can complete the task without delay.
Next, inspect the area where you'll be working to ensure it's clean and free of debris. A cluttered workspace can lead to misplaced tools or parts, and may even cause accidents. Once the area is clean, position your dirt bike on a stable surface, such as a workbench or a flat, level area of the garage. If you're using a lift, make sure it's securely locked in place. The bike should be positioned in such a way that you have easy access to the carburetor and can work comfortably without straining.
With the bike in place, take a moment to familiarize yourself with the carburetor's location and the surrounding components. This will help you avoid damaging other parts during the draining process. If you're unsure about the location or function of any component, consult your bike's manual or seek advice from a professional mechanic. Remember, taking the time to prepare properly can save you time and effort in the long run, and more importantly, it can help prevent accidents and injuries.
Mastering the Art of Wheelies on Your Dirt Bike
You may want to see also
Explore related products


Safety: Wear protective gloves and eyewear; disconnect the battery
Before beginning the process of draining a carburetor on a dirt bike, it is crucial to prioritize safety. Wearing protective gloves and eyewear is essential to prevent any potential injuries from sharp edges, chemicals, or debris. Additionally, disconnecting the battery is a vital step to ensure that there is no electrical current running through the bike during the procedure, which could cause sparks or other hazards.
When it comes to selecting the right protective gear, it is important to choose gloves that are specifically designed for mechanical work, as they will provide better grip and protection against abrasions. Safety glasses or goggles should also be worn to protect the eyes from any flying debris or chemical splashes. It is recommended to use a battery disconnect tool or a wrench to safely remove the battery cables, starting with the negative cable and then the positive cable.
Once the battery is disconnected, it is important to wait for a few minutes to ensure that any residual electrical charge has dissipated. This will help prevent any accidental sparks that could ignite fuel vapors or cause other hazards. It is also a good idea to have a fire extinguisher nearby, just in case of an emergency.
In addition to wearing protective gear and disconnecting the battery, it is important to work in a well-ventilated area to avoid inhaling any harmful fumes. It is also recommended to have a drain pan or container ready to catch any fuel or other fluids that may spill during the procedure. By taking these safety precautions, you can help ensure that the process of draining a carburetor on a dirt bike is completed safely and efficiently.
Mastering the Art of Whoops on Your Dirt Bike: A Step-by-Step Guide
You may want to see also
Explore related products


Access: Locate and remove the carburetor drain plug
To access the carburetor drain plug on a dirt bike, you'll need to follow a series of precise steps. First, ensure the bike is on a level surface and the engine is cool to the touch. Locate the carburetor, which is typically mounted on the right side of the bike, just below the seat. It's a cylindrical component with various tubes and wires connected to it.
Once you've identified the carburetor, look for the drain plug, which is usually a small, hexagonal or round plug located at the bottom of the carburetor bowl. You may need to remove some surrounding components, such as the air filter or carburetor cover, to gain clear access to the plug. Use a suitable wrench or socket to loosen and remove the drain plug. Be careful not to overtighten or strip the plug, as this can cause damage to the carburetor.
With the drain plug removed, you can now proceed to drain the carburetor bowl. Hold a container or rag beneath the drain plug to catch any fuel or debris that may come out. Gently tap the carburetor bowl to encourage the contents to drain out completely. It's essential to ensure that all fuel and sediment are removed to prevent any blockages or issues when the carburetor is refilled.
After draining the carburetor, inspect the drain plug for any signs of wear or damage. If the plug is in good condition, you can reuse it. Otherwise, replace it with a new one to ensure a proper seal. Before reinstalling the drain plug, clean the threads and surrounding area to remove any debris or old gasket material. Apply a small amount of thread sealant or gasket maker to the threads of the drain plug, then hand-tighten it until it's snug. Avoid over-tightening, as this can cause the plug to strip or the carburetor to crack.
Finally, reassemble any components you removed to access the carburetor drain plug. Start the engine and check for any leaks or issues. If everything appears to be functioning correctly, you've successfully drained and maintained your dirt bike's carburetor. Remember to dispose of any used fuel or rags properly, following local regulations and safety guidelines.
Mastering the Art of Donuting on a Dirt Bike: A Step-by-Step Guide
You may want to see also
Explore related products


Draining: Allow the fuel to drain into a container; be cautious of spills
Begin the draining process by ensuring the dirt bike is positioned on a level surface to prevent uneven fuel flow. Remove the fuel cap and insert a hose or tube into the fuel tank, allowing the fuel to drain into a suitable container. It's crucial to use a container with a wide opening to minimize the risk of spills and to have a funnel handy to guide the fuel flow if necessary.
During the draining process, be vigilant about potential spills. Fuel can be slippery and hazardous, so it's essential to contain any drips or leaks. Lay down absorbent material, such as rags or paper towels, around the draining area to catch any stray fuel. Additionally, ensure good ventilation in the workspace to avoid inhaling fuel fumes, which can be harmful.
Once the fuel has been completely drained, inspect the carburetor for any blockages or debris that may have been dislodged during the process. Use a soft brush or compressed air to clean out any particles that could impede the carburetor's function. After cleaning, reassemble the carburetor and fuel system components, making sure all connections are secure to prevent future leaks.
It's also important to dispose of the drained fuel properly. Check local regulations for fuel disposal guidelines, as improper disposal can be harmful to the environment. Many communities have designated facilities or programs for safely disposing of automotive fluids.
Finally, after draining and cleaning the carburetor, it's a good practice to run the dirt bike briefly to ensure that the carburetor is functioning correctly. This will help to confirm that the draining process was successful and that the bike is ready for use.
Dirt Bike Drag Racing 101: Tips and Techniques to Get You Started
You may want to see also
Explore related products



Reassembly: Replace the drain plug and reconnect the battery; test the bike
With the carburetor drained and cleaned, it's time to reassemble the components and get your dirt bike ready for action. Start by replacing the drain plug securely, ensuring it's tightened to the manufacturer's specifications to prevent any leaks. Next, reconnect the battery, making sure the terminals are clean and the connections are firm. This is crucial for the bike's electrical system to function properly.
Before firing up the engine, perform a quick visual inspection to ensure all components are in place and there are no loose connections or hoses. Check the fuel level and quality, as well as the oil level, to ensure everything is ready for operation. If you've replaced any parts during the draining process, double-check that they're properly installed and functioning.
Now, it's time to test the bike. Start the engine and let it idle for a few minutes to warm up. Listen for any unusual noises or vibrations, and check for any leaks around the carburetor or other components. Once the engine is warm, take the bike for a short ride to ensure it's running smoothly and responding well to throttle inputs. Pay attention to the bike's performance, especially during acceleration and deceleration, to identify any potential issues.
If you encounter any problems during the test ride, such as stalling, sputtering, or poor performance, don't hesitate to stop and investigate. It's better to address any issues immediately rather than risk damaging the engine or putting yourself in danger. Remember, proper maintenance and attention to detail are key to keeping your dirt bike in top condition and ensuring a safe and enjoyable riding experience.
Mastering the Art of Downshifting on Your Dirt Bike
You may want to see also