Samantha Lee
Separating bike chain links is a crucial skill for any cyclist, as it allows for easy maintenance, repair, and replacement of the chain. Whether you're a seasoned rider or a beginner, knowing how to break a bike chain link properly can save you time and money. In this guide, we'll walk you through the step-by-step process of separating bike chain links, covering the necessary tools, techniques, and safety precautions. By the end, you'll be able to confidently tackle this essential bike maintenance task.
Explore related products


What You'll Learn
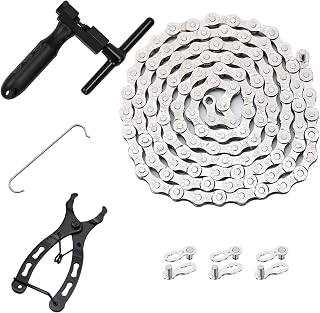
- Gather necessary tools: Chain tool, pin, hammer, anvil, lubricant, rag, safety glasses
- Prepare the chain: Clean and lubricate the chain for easier manipulation
- Identify the pin: Locate the chain pin you wish to remove
- Use chain tool: Insert the chain tool into the pin and turn to push it out
- Separate the links: Once the pin is removed, separate the two chain links

Gather necessary tools: Chain tool, pin, hammer, anvil, lubricant, rag, safety glasses
Before you begin the process of separating bike chain links, it's crucial to gather all the necessary tools. A chain tool is essential for pushing out the pins that hold the chain links together. You'll also need a pin to replace any that you remove, ensuring the chain remains functional. A hammer and anvil provide the force and surface needed to drive the chain tool and remove the pins effectively. Lubricant is important for ensuring smooth operation of the chain tool and preventing rust on the chain. A rag will come in handy for cleaning off any excess lubricant or debris, and safety glasses are a must to protect your eyes from flying pins or chain links.
Once you have all your tools ready, lay out the bike chain on a flat, stable surface. Apply a small amount of lubricant to the chain tool's tip and the pin you're about to remove. This will help the tool glide more easily and reduce the risk of damaging the chain. Position the chain tool over the pin, ensuring it's aligned correctly. Then, use the hammer to gently tap the chain tool, driving it into the pin. Be careful not to apply too much force, as this can cause the pin to fly out unexpectedly.
As you push the pin out, keep an eye on it to prevent it from getting lost. Once the pin is partially out, you can use your fingers or a pair of pliers to carefully remove it completely. Repeat this process for each pin you need to remove to separate the chain links. Remember to keep the removed pins in a safe place, as you'll need them to reassemble the chain later.
After separating the chain links, use the rag to clean off any excess lubricant or debris from the chain and tools. This will help maintain the chain's performance and prolong its lifespan. Store the tools and pins in a dry, secure location to prevent rust and loss. With the right tools and a bit of patience, separating bike chain links can be a straightforward and rewarding task.
Effortless Bike Maintenance: Mastering the Art of Chain Replacement
You may want to see also
Explore related products



Prepare the chain: Clean and lubricate the chain for easier manipulation
Before attempting to separate bike chain links, it's crucial to prepare the chain properly. This involves cleaning and lubricating the chain to ensure easier manipulation. Start by removing any dirt or grime buildup using a degreaser and a brush specifically designed for bike chains. This will help to prevent any particles from interfering with the chain's movement and make it easier to identify the links that need to be separated.
Once the chain is clean, it's time to lubricate it. Choose a high-quality bike chain lubricant and apply it sparingly to each link, ensuring that it penetrates the rollers and pins. This will reduce friction and wear, making it easier to manipulate the chain during the separation process. Be sure to wipe off any excess lubricant with a clean rag to prevent attracting dirt and grime.
When preparing the chain, it's important to inspect it for any signs of damage or wear. Look for stretched or bent links, as well as any signs of rust or corrosion. If any damage is found, it's best to replace the entire chain rather than attempting to separate and repair it. This will ensure the safety and longevity of the bike.
In addition to cleaning and lubricating the chain, it's helpful to have the right tools on hand for separating the links. A chain tool, also known as a chain whip, is specifically designed for this purpose and will make the process much easier. It's also a good idea to have a spare chain pin and a pair of pliers available in case any additional adjustments are needed.
Finally, when preparing the chain, it's important to consider the environment in which the bike will be ridden. If the bike will be used in wet or muddy conditions, it's a good idea to use a waterproof lubricant to protect the chain from the elements. This will help to prevent rust and corrosion, ensuring that the chain remains in good condition for as long as possible.
Mastering the Art of Routing Your Bike Chain Through the Rear Derailleur
You may want to see also
Explore related products


Identify the pin: Locate the chain pin you wish to remove
To identify the pin, you'll need to closely inspect your bike chain. Each link in the chain is held together by a pin, which is a small, cylindrical piece of metal. The pin is typically located at the center of the link, where the two ends of the link meet. To locate the pin you wish to remove, you'll need to find the link that you want to separate. This could be a link that is damaged, rusted, or simply one that you want to replace. Once you've identified the link, you can then focus on the pin that holds it together.
When identifying the pin, it's important to note that not all pins are the same. Some pins may be slightly larger or smaller than others, and some may have a different shape or design. This is because different bike chains may have different pin sizes or designs, depending on the manufacturer and the specific model of the chain. So, when you're trying to locate the pin, make sure to pay attention to these differences.
To make it easier to identify the pin, you may want to use a tool such as a chain tool or a pair of pliers. These tools can help you to hold the chain in place while you inspect it, and they can also help you to remove the pin once you've located it. However, be careful when using these tools, as they can also damage the chain or the pin if not used properly.
Once you've located the pin, you'll need to remove it in order to separate the chain links. This can be done using a chain tool, which is specifically designed for this purpose. To use a chain tool, you'll need to place the chain on the tool and then turn the handle to push the pin out of the link. Be careful when doing this, as the pin can be easily lost or damaged if not handled properly.
In some cases, you may not be able to remove the pin using a chain tool. This could be because the pin is too tight, too rusted, or too damaged. In these cases, you may need to use a different method to remove the pin, such as using a pair of pliers or a hammer and chisel. However, these methods can be more difficult and may require more skill and experience.
After you've removed the pin, you should inspect it carefully to make sure that it is not damaged. If the pin is damaged, you may need to replace it before you can reassemble the chain. Once you've inspected the pin and determined that it is in good condition, you can then proceed to separate the chain links and make any necessary repairs or replacements.
Revive Your Ride: The Ultimate Guide to Restoring Your Bike Chain
You may want to see also
Explore related products


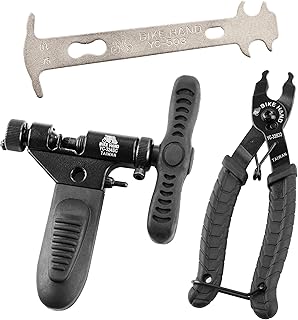
Use chain tool: Insert the chain tool into the pin and turn to push it out
To separate bike chain links using a chain tool, begin by inserting the chain tool into the pin of the link you wish to remove. Ensure the tool is properly aligned with the pin's center. Once inserted, apply gentle but firm pressure to the tool, turning it in the direction that pushes the pin out of the link. This action will gradually loosen the pin, allowing you to remove it completely.
It's crucial to use the correct size chain tool for your specific bike chain to avoid damaging the links or the tool itself. Additionally, make sure the chain is properly lubricated before attempting to remove any links, as this will make the process smoother and reduce the risk of the pin seizing.
When pushing out the pin, be cautious not to apply too much force, as this can cause the pin to snap or the link to become damaged. If the pin is particularly stubborn, you may need to use a second chain tool to provide additional leverage. Once the pin is fully removed, carefully separate the two halves of the link, taking note of the orientation of each piece for easy reassembly later.
Remember to always work in a well-lit area and use safety glasses to protect your eyes from any debris. After separating the chain links, it's a good practice to clean and inspect the chain for any signs of wear or damage before reassembling it. This will help ensure the chain functions smoothly and safely during your next ride.
Mastering Chain Repositioning: A Cyclist's Guide to Smooth Shifting
You may want to see also
Explore related products




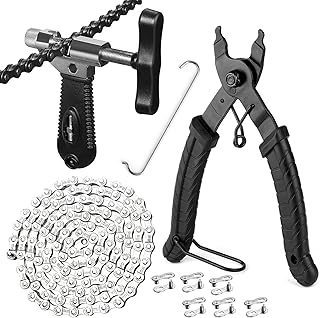
Separate the links: Once the pin is removed, separate the two chain links
With the pin successfully removed from the bike chain, the next crucial step is to separate the two chain links. This process requires a delicate balance of force and precision to avoid damaging the chain or injuring yourself. Begin by holding the chain in one hand, with the link you intend to separate positioned near the edge of your fingers. Use your other hand to gently push the two links apart, applying steady pressure until you feel a slight give.
As you push the links apart, be mindful of the chain's tension and the direction in which you're applying force. You want to avoid putting undue stress on the chain, which could cause it to snap or become misshapen. Instead, focus on using a controlled, gentle motion to coax the links apart. If you encounter resistance, try adjusting your grip or the angle at which you're pushing the links.
Once the links are separated, take a moment to inspect the chain for any signs of damage or wear. Look for bent or twisted links, as well as any areas where the metal appears to be worn down or corroded. If you notice any issues, it may be necessary to replace the chain or seek professional assistance to ensure safe and efficient operation of your bike.
In some cases, you may need to use a chain tool to assist with the separation process. A chain tool is a specialized device designed to push the pins out of the chain links, making it easier to separate them. If you're using a chain tool, be sure to follow the manufacturer's instructions carefully and take appropriate safety precautions to avoid injury.
After successfully separating the links, you can proceed with the next steps in your bike maintenance or repair process. Whether you're shortening the chain, replacing a damaged link, or performing routine maintenance, separating the links is a critical step that requires patience, precision, and attention to detail. By following these guidelines and taking the necessary precautions, you can ensure a safe and successful outcome.
Mastering the Art of Bike Chain Routing: A Comprehensive Guide
You may want to see also
Frequently asked questions
To separate bike chain links, you'll need a chain tool, also known as a chain whip. This tool is specifically designed to push out the pins that hold the chain links together.
To use a chain tool, first, position the tool around the chain link you want to separate. Then, screw the tool into the link until it makes contact with the pin. Finally, apply force to the handle of the tool to push the pin out of the link, separating the two links.
When separating bike chain links, it's important to wear protective gloves to avoid injury from the sharp edges of the chain. Additionally, make sure the bike is properly supported and the chain is not under tension to prevent any accidents. After separating the links, be sure to clean and lubricate the chain to maintain its performance.