Matthew Brooks
Replacing a bike chain rivet is a crucial maintenance task that ensures the longevity and smooth operation of your bicycle's chain. Over time, rivets can become worn or damaged, leading to a decrease in chain strength and potential failure. To address this issue, it's essential to have the right tools and knowledge. In this guide, we'll walk you through the step-by-step process of removing and replacing a bike chain rivet, including the necessary precautions and tips to make the task easier and more effective. By following these instructions, you'll be able to keep your bike's chain in top condition, ensuring a safer and more enjoyable riding experience.
Explore related products


What You'll Learn
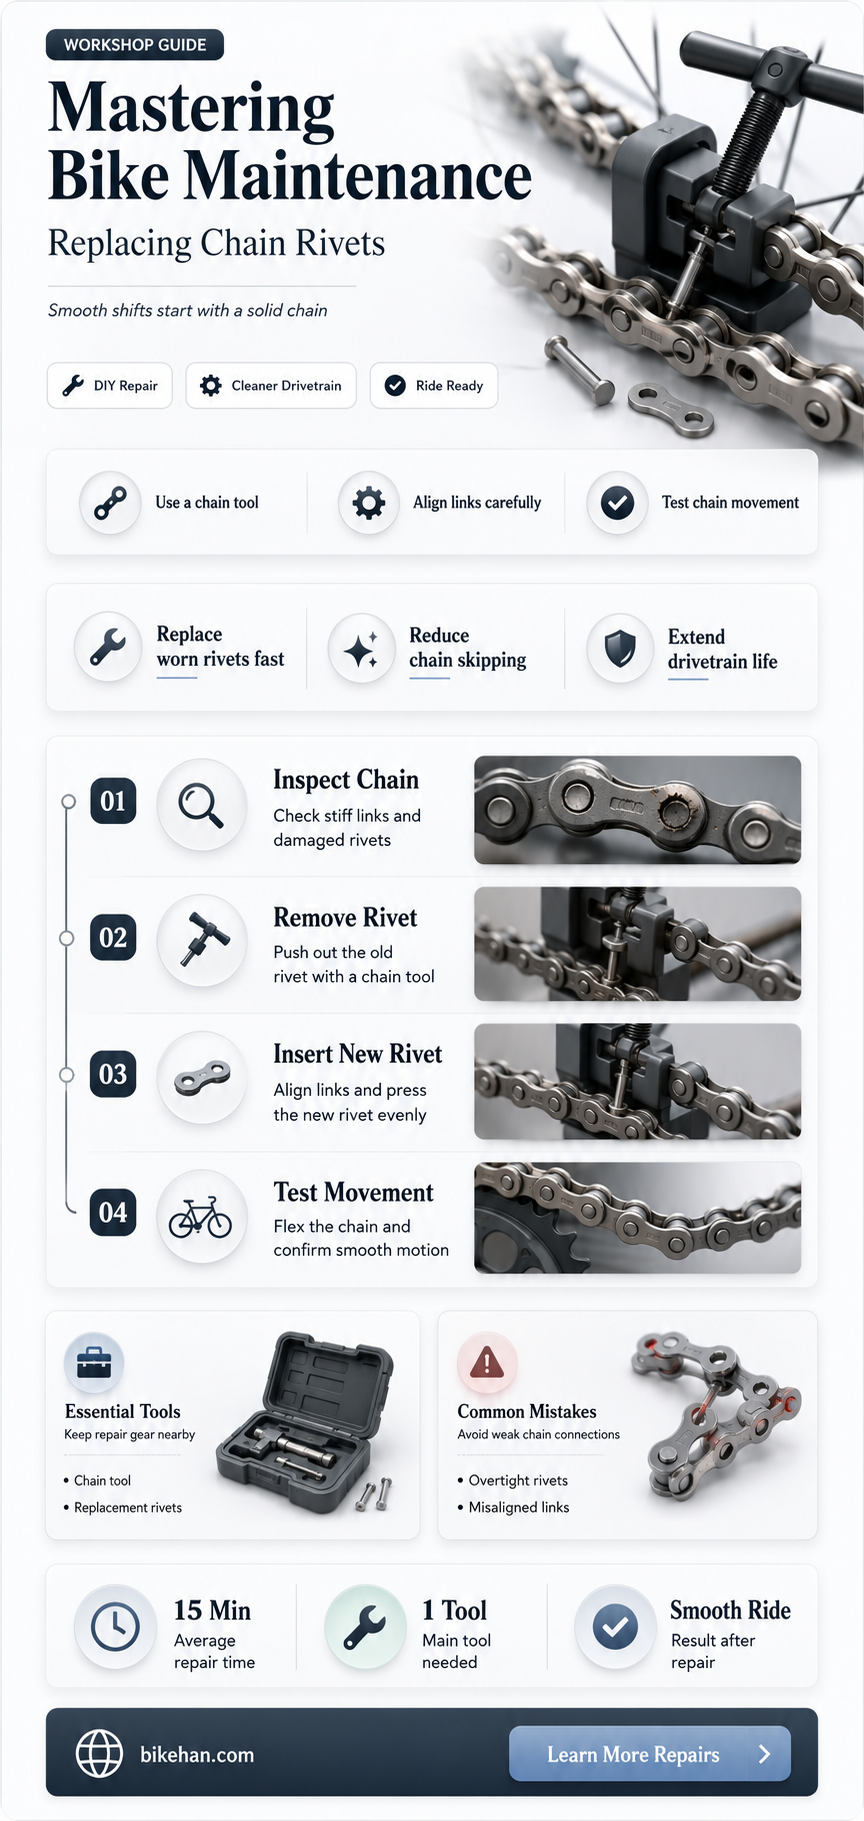
- Gather necessary tools: Chain rivet tool, new rivets, chain lubricant, rag, gloves
- Prepare the chain: Clean the chain thoroughly, apply lubricant, ensure proper alignment
- Remove old rivet: Use rivet tool to push out the old rivet from the chain link
- Install new rivet: Insert new rivet into the chain link, ensuring it's seated correctly
- Test the chain: Check for smooth movement, proper tension, and secure links

Gather necessary tools: Chain rivet tool, new rivets, chain lubricant, rag, gloves
Before you begin the process of replacing a bike chain rivet, it's crucial to gather all the necessary tools. A chain rivet tool is essential for removing the old rivets and installing new ones. This tool is specifically designed to fit over the chain's pins and apply the required force to push the rivets out. Make sure to select a tool that is compatible with your bike chain's size and type.
In addition to the chain rivet tool, you'll need new rivets that match the specifications of your bike chain. It's important to use the correct size and type of rivets to ensure a secure and proper fit. Chain lubricant is another essential item, as it helps to reduce friction and wear on the chain, prolonging its lifespan. A rag and gloves are also necessary for cleaning the chain and protecting your hands during the process.
When selecting gloves, choose ones that provide a good grip and are made of durable material to protect your hands from sharp edges and grease. A clean rag is useful for wiping away any excess lubricant and dirt from the chain, ensuring a smooth and efficient operation.
Before starting the replacement process, it's a good idea to inspect your bike chain for any signs of wear or damage. Look for stretched or rusted links, as these may indicate that it's time to replace the entire chain rather than just a single rivet. If you're unsure about the condition of your chain, consult a professional mechanic for advice.
Remember, safety should always be a top priority when working on your bike. Make sure to wear appropriate protective gear, such as gloves and safety glasses, and work in a well-lit and stable environment. By taking the time to gather the necessary tools and prepare your workspace, you can ensure a successful and hassle-free bike chain rivet replacement.
Mastering Bike Maintenance: A Guide to Chain Repair
You may want to see also
Explore related products


Prepare the chain: Clean the chain thoroughly, apply lubricant, ensure proper alignment
Before you begin the process of replacing a bike chain rivet, it's crucial to prepare the chain properly. This involves a thorough cleaning to remove any dirt, grime, or old lubricant that could interfere with the new rivet's installation. Use a degreaser specifically designed for bike chains and a stiff brush to scrub away any debris. After cleaning, allow the chain to dry completely before proceeding.
Once the chain is clean and dry, apply a suitable lubricant to ensure smooth operation and to protect the chain from wear and corrosion. Choose a lubricant that is appropriate for the conditions in which you typically ride your bike. For example, if you often ride in wet or muddy conditions, opt for a wet lubricant that can withstand moisture. Apply the lubricant sparingly, working it into the rollers and pins of the chain links.
Proper alignment of the chain is also essential for safe and efficient bike operation. Check that the chain is correctly positioned on the sprockets and that it moves smoothly without any kinks or twists. If the chain is misaligned, adjust the derailleur or the chainrings as necessary to ensure that the chain runs straight and true.
In addition to these steps, it's important to inspect the chain for any signs of wear or damage. Look for stretched or kinked links, as well as any signs of rust or corrosion. If you notice any issues, it may be necessary to replace the entire chain rather than just a single rivet.
When preparing the chain, it's also a good idea to have all the necessary tools and replacement parts on hand. This includes a chain tool for removing and installing rivets, as well as spare rivets and pins. Having everything you need ready to go will make the process of replacing the rivet much smoother and more efficient.
Finally, always follow the manufacturer's instructions for your specific bike and chain when performing maintenance tasks. This will help ensure that you are using the correct techniques and products for your particular setup.
Effortless Bike Maintenance: Mastering the Art of Chain Replacement
You may want to see also
Explore related products


Remove old rivet: Use rivet tool to push out the old rivet from the chain link
To remove an old rivet from a bike chain, you'll need a rivet tool, which is specifically designed for this task. The rivet tool typically has a handle and a tip that fits over the rivet head. Begin by positioning the tip of the rivet tool directly over the head of the old rivet. Ensure that the tool is aligned properly to avoid damaging the chain link or the rivet itself.
Once the rivet tool is in place, apply steady pressure to the handle. This action will push the rivet out of the chain link. It's important to use controlled force to prevent the rivet from snapping or breaking, which could make removal more difficult. If the rivet is particularly stubborn, you may need to use a bit more force, but always be cautious to avoid damaging the chain.
As the rivet begins to move, keep the tool aligned and continue applying pressure until the rivet is completely removed from the chain link. After the old rivet is out, inspect the chain link for any damage or wear. If the link is in good condition, you can proceed to insert a new rivet. However, if the link shows signs of wear or damage, it's advisable to replace the entire link to ensure the safety and reliability of the chain.
When inserting a new rivet, use the appropriate size and type for your specific bike chain. Position the new rivet in the chain link and use the rivet tool to push it in place. Apply steady pressure until the rivet is fully seated and flush with the surface of the chain link. Once the new rivet is secure, test the chain to ensure smooth movement and proper function.
Remember, safety is paramount when working on your bike chain. Always wear protective gear, such as gloves and safety glasses, to prevent injury. If you're unsure about the process or encounter any difficulties, it's best to consult a professional bike mechanic to ensure the job is done correctly and safely.
Mastering Bike Maintenance: The Easy Guide to Replacing a Chain Link
You may want to see also
Explore related products


Install new rivet: Insert new rivet into the chain link, ensuring it's seated correctly
Begin by carefully selecting the appropriate replacement rivet for your bike chain. It's crucial to match the rivet's size and material to the original specifications to ensure compatibility and optimal performance. Once you have the correct rivet, position it over the chain link where the old rivet was removed.
Using a rivet press or a flathead screwdriver, gently tap the new rivet into place. Be sure to apply even pressure to avoid damaging the chain link or the rivet itself. As you insert the rivet, double-check that it is seated correctly within the link's recess. The rivet should be flush with the surface of the chain link, with no gaps or protrusions.
If you encounter resistance while inserting the rivet, do not force it. Instead, re-examine the alignment and ensure that the rivet is properly positioned. Forcing a misaligned rivet can lead to damage or improper installation. Once the rivet is fully seated, inspect the chain link to confirm that the rivet is secure and that the link is closed properly.
After installing the new rivet, it's essential to test the chain's functionality. Shift the chain through its gears to ensure smooth operation and check for any signs of misalignment or unusual noise. If you notice any issues, re-inspect the rivet installation and make adjustments as necessary.
Remember, proper installation of a new rivet is critical for maintaining the integrity and safety of your bike chain. Take your time and follow these steps carefully to ensure a successful replacement.
Effortless Cycling: Mastering the Art of 7-Speed Bike Chain Replacement
You may want to see also
Explore related products


Test the chain: Check for smooth movement, proper tension, and secure links
After replacing a bike chain rivet, it's crucial to test the chain to ensure it functions correctly and safely. Begin by checking for smooth movement. Gently rotate the pedals backward and forward, observing the chain's motion around the sprockets. The chain should glide effortlessly without any signs of catching or hesitation. If the chain moves smoothly, proceed to the next step.
Next, assess the chain's tension. Proper tension is essential for efficient power transfer and to prevent the chain from slipping off the sprockets. Use a chain tension gauge to measure the tension, ensuring it falls within the manufacturer's recommended range. If the tension is too low, the chain may slip; if it's too high, it can cause excessive wear and reduce efficiency. Adjust the tension as necessary by turning the barrel adjuster on the derailleur.
Finally, inspect the links for security. Each link should be firmly connected, with no signs of looseness or damage. Pay particular attention to the newly replaced rivet, ensuring it is properly seated and secure. A loose or damaged link can lead to chain failure, potentially causing injury or damage to the bike. If any issues are detected during these tests, address them immediately before riding the bike.
Effortless Cycling: Mastering the Art of Replacing Your 10-Speed Bike Chain
You may want to see also
Frequently asked questions
To replace a bike chain rivet, you will need a chain rivet tool, also known as a chain pin tool, and a hammer. Some chain rivet tools come with a built-in hammer, but if yours doesn't, a small ball-peen hammer will work well.
To remove the old rivet, position the chain rivet tool over the rivet you want to remove. Make sure the tool is aligned with the rivet and the chain is held steady. Then, use the hammer to gently tap the rivet out of the chain. Be careful not to damage the chain links or the rivet itself if you plan to reuse it.
To install a new rivet, first, position the chain rivet tool over the empty link where the new rivet will go. Make sure the tool is aligned with the link and the chain is held steady. Then, insert the new rivet into the tool and use the hammer to gently tap the rivet into the chain. Be careful not to over-tighten the rivet, as this can cause the chain to become stiff and difficult to move.
Some common mistakes to avoid when replacing a bike chain rivet include:
- Not aligning the chain rivet tool properly with the rivet or the chain link, which can cause damage to the chain or the rivet.
- Using too much force when removing or installing the rivet, which can also cause damage to the chain or the rivet.
- Not holding the chain steady while working on it, which can cause the chain to move unexpectedly and potentially cause injury.
- Forgetting to check the chain for proper tension and lubrication after replacing the rivet, which can affect the performance and longevity of the chain.