 Samantha Lee
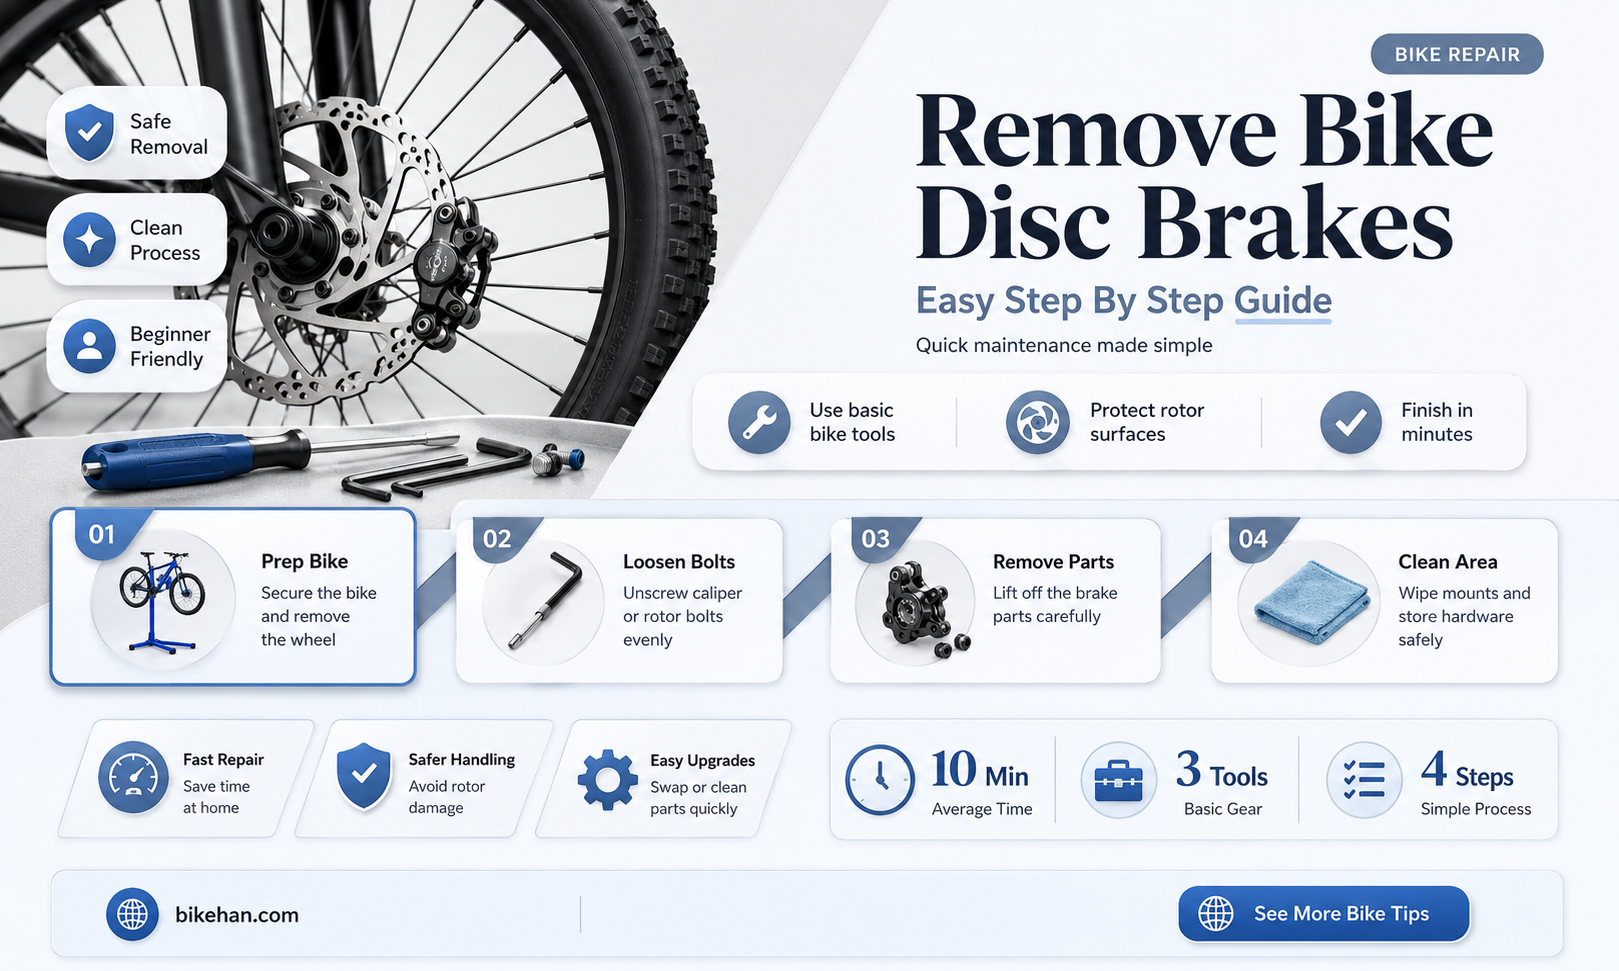
Removing bike wheel disc brakes can be a straightforward process if you have the right tools and follow the correct steps. Disc brakes are a common feature on modern bicycles, providing reliable stopping power in various weather conditions. However, they do require occasional maintenance or replacement. To remove disc brakes, you'll need to ensure your bike is securely positioned, then follow a series of steps that include loosening the brake caliper bolts, carefully removing the caliper, and then releasing the brake rotor from the wheel hub. It's important to be methodical and patient during this process to avoid damaging any components.
Explore related products


What You'll Learn
- Gather necessary tools: Assemble all required tools like hex keys, pliers, and a screwdriver for the task
- Loosen the caliper bolts: Use a hex key to loosen the bolts securing the brake caliper to the frame
- Remove the caliper: Carefully detach the caliper from the frame and set it aside
- Release the brake pads: Open the caliper and remove the brake pads, ensuring you don't damage them
- Clean and inspect: Clean the rotor and caliper mounting area, and inspect for wear or damage before reassembly

Gather necessary tools: Assemble all required tools like hex keys, pliers, and a screwdriver for the task
Before diving into the process of removing bike wheel disc brakes, it's crucial to ensure you have the right tools at hand. This not only makes the task more efficient but also helps prevent potential damage to your bike or injury to yourself. Start by assembling all the necessary tools, which typically include hex keys, pliers, and a screwdriver. These tools are essential for loosening bolts, manipulating small parts, and prying components apart.
Hex keys, also known as Allen wrenches, are particularly important for bike maintenance as many modern bikes use hexagonal bolts and screws. Make sure you have a set of hex keys in various sizes to accommodate different bolts on your bike. Pliers are versatile tools that can be used for gripping, bending, and cutting. They're especially useful for holding small parts steady while you work on them. A screwdriver, preferably a set with multiple heads, is necessary for removing screws that hold the brake components in place.
Once you've gathered your tools, lay them out in an organized manner so you can easily access them as needed. This will save you time and frustration during the removal process. It's also a good idea to clean your tools beforehand to ensure they're free of dirt and debris that could interfere with your work.
Remember, safety should always be a priority when working on your bike. Wear appropriate protective gear, such as gloves and safety glasses, to protect yourself from sharp edges and flying debris. And if you're unsure about any part of the process, don't hesitate to consult a professional mechanic or refer to your bike's user manual for guidance.
In summary, gathering the necessary tools is a critical first step in removing bike wheel disc brakes. By ensuring you have the right equipment and taking safety precautions, you can make the task more manageable and reduce the risk of accidents or damage to your bike.
Reviving Your Ride: A Guide to Removing Rusted, Seized Brake Cables
You may want to see also
Explore related products


Loosen the caliper bolts: Use a hex key to loosen the bolts securing the brake caliper to the frame
To begin the process of removing a bike wheel with disc brakes, you must first loosen the caliper bolts. This step is crucial as it allows you to detach the brake caliper from the frame, giving you access to the wheel. Start by identifying the hex key that fits the bolts on your brake caliper. Typically, these bolts are either 4mm or 5mm, but it's essential to use the correct size to avoid stripping the bolts.
Once you have the appropriate hex key, position yourself so that you have easy access to the brake caliper. This might involve flipping the bike upside down or using a bike stand to elevate the wheel. Insert the hex key into the bolt and turn it counterclockwise to loosen. Be careful not to overtighten, as this can cause the bolt to seize. If the bolt is particularly tight, you may need to use a bit of penetrating oil to help loosen it.
After loosening the first bolt, move on to the second bolt on the opposite side of the caliper. Again, turn the hex key counterclockwise to loosen the bolt. Once both bolts are sufficiently loosened, you can remove them completely and set them aside, making sure to keep track of their position for reassembly later.
With the bolts removed, gently pull the brake caliper away from the frame. Be cautious not to damage the brake pads or the rotor as you do this. Once the caliper is free, you can proceed to remove the wheel from the bike. This process will vary depending on the type of wheel and bike frame you have, but typically involves releasing the quick-release lever or unscrewing the thru-axle.
Remember, when reassembling the bike, it's crucial to tighten the caliper bolts evenly to ensure proper brake function. Failure to do so can result in uneven brake wear or even brake failure. By following these steps carefully, you can safely remove and replace your bike wheel with disc brakes.
Effortless Maintenance: Swapping Out Bike Disk Brake Pads
You may want to see also
Explore related products


Remove the caliper: Carefully detach the caliper from the frame and set it aside
Begin by ensuring the bike is securely positioned on a stand or suspended in a way that allows easy access to the wheels. This step is crucial for safety and efficiency. Next, locate the caliper, which is typically mounted near the rotor on the wheel. It's held in place by bolts that pass through the frame and into the caliper's mounting holes.
Using the appropriate size Allen wrench or hex key, carefully loosen the bolts securing the caliper. It's important to do this gradually and evenly to avoid stripping the bolts or damaging the frame. Once the bolts are sufficiently loosened, gently pull the caliper away from the frame. Be cautious not to yank it forcefully, as this could damage the brake lines or other components.
After detaching the caliper, set it aside in a safe place where it won't be knocked over or damaged. Make sure to keep track of the bolts and any washers or spacers that were used, as these will be needed when reassembling the brake system.
With the caliper removed, you should now have clear access to the rotor and the rest of the wheel. This step is often necessary when performing maintenance on the brake system, such as replacing the brake pads or servicing the rotor. Remember to always follow the manufacturer's guidelines for your specific bike model when performing any maintenance tasks.
In summary, removing the caliper involves carefully loosening the securing bolts, gently detaching it from the frame, and setting it aside safely. This process requires attention to detail and the use of the correct tools to ensure that no damage is done to the bike's components.
Explore related products


Release the brake pads: Open the caliper and remove the brake pads, ensuring you don't damage them
To release the brake pads, you'll need to open the caliper. This is typically done by removing a bolt or pin that secures the caliper to the brake mount. Be careful not to damage the brake pads as you remove them.
Before you begin, make sure you have the necessary tools. You'll need a hex wrench or Allen key, depending on the type of bolt used to secure the caliper. You may also need a pair of pliers to help remove the brake pads.
Once you have the tools, follow these steps:
- Remove the bolt or pin that secures the caliper to the brake mount. This may require some force, so be prepared to use a bit of elbow grease.
- Carefully pull the caliper away from the brake mount. Be careful not to damage the brake pads as you do this.
- Remove the brake pads from the caliper. This may require some manipulation, so be patient and take your time.
- Inspect the brake pads for damage. If they are damaged, replace them before reinstalling the wheel.
Remember to always follow the manufacturer's instructions when removing and replacing brake pads. Failure to do so could result in damage to your bike or injury to yourself.
Explore related products




Clean and inspect: Clean the rotor and caliper mounting area, and inspect for wear or damage before reassembly
Before reassembling your bike's disc brake system, it's crucial to thoroughly clean and inspect the rotor and caliper mounting area. This step is often overlooked but is essential for ensuring optimal brake performance and longevity. Start by using a soft brush or cloth to remove any dirt, debris, or old brake pad residue from the rotor surface. Be sure to clean both sides of the rotor, as well as the caliper mounting area on the frame or fork.
Once the components are clean, inspect the rotor for any signs of wear or damage. Look for scratches, dents, or rust that could compromise the brake's effectiveness. If you notice any significant wear, it may be necessary to replace the rotor. Similarly, examine the caliper mounting area for any signs of damage or corrosion. If you find any issues, address them before proceeding with reassembly.
When inspecting the caliper itself, pay close attention to the brake pads. Check for uneven wear, cracks, or any other damage that could affect braking performance. If the pads are worn down to the point where the backing plate is visible, they should be replaced. Additionally, inspect the caliper's pistons for any signs of leakage or damage. If you notice any issues with the pistons, it may be necessary to replace the entire caliper.
After completing the cleaning and inspection process, you can proceed with reassembling the disc brake system. Be sure to follow the manufacturer's instructions for proper installation and adjustment of the brake components. Remember to test the brakes thoroughly before riding to ensure they are functioning correctly and safely.
Frequently asked questions
To remove disc brakes from your bike wheel, you'll need a few essential tools. These typically include a disc brake caliper tool or a flathead screwdriver, a wrench or socket set for the caliper bolts, and possibly a rotor tool if you need to remove the rotor as well.
To safely remove the disc brake caliper, first ensure your bike is securely mounted in a stand or upside down with the wheels in the air. Then, using the appropriate tool, loosen the caliper bolts and carefully remove the caliper from the rotor. Be cautious not to damage the rotor or the caliper during this process.
When removing disc brakes, it's important to take several precautions to avoid damaging your bike wheel. First, always use the correct tools to prevent stripping bolts or damaging components. Second, be gentle when removing the caliper and rotor to avoid bending or scratching them. Finally, make sure to properly secure your bike during the process to prevent it from falling and causing damage.


