Eric Johnson
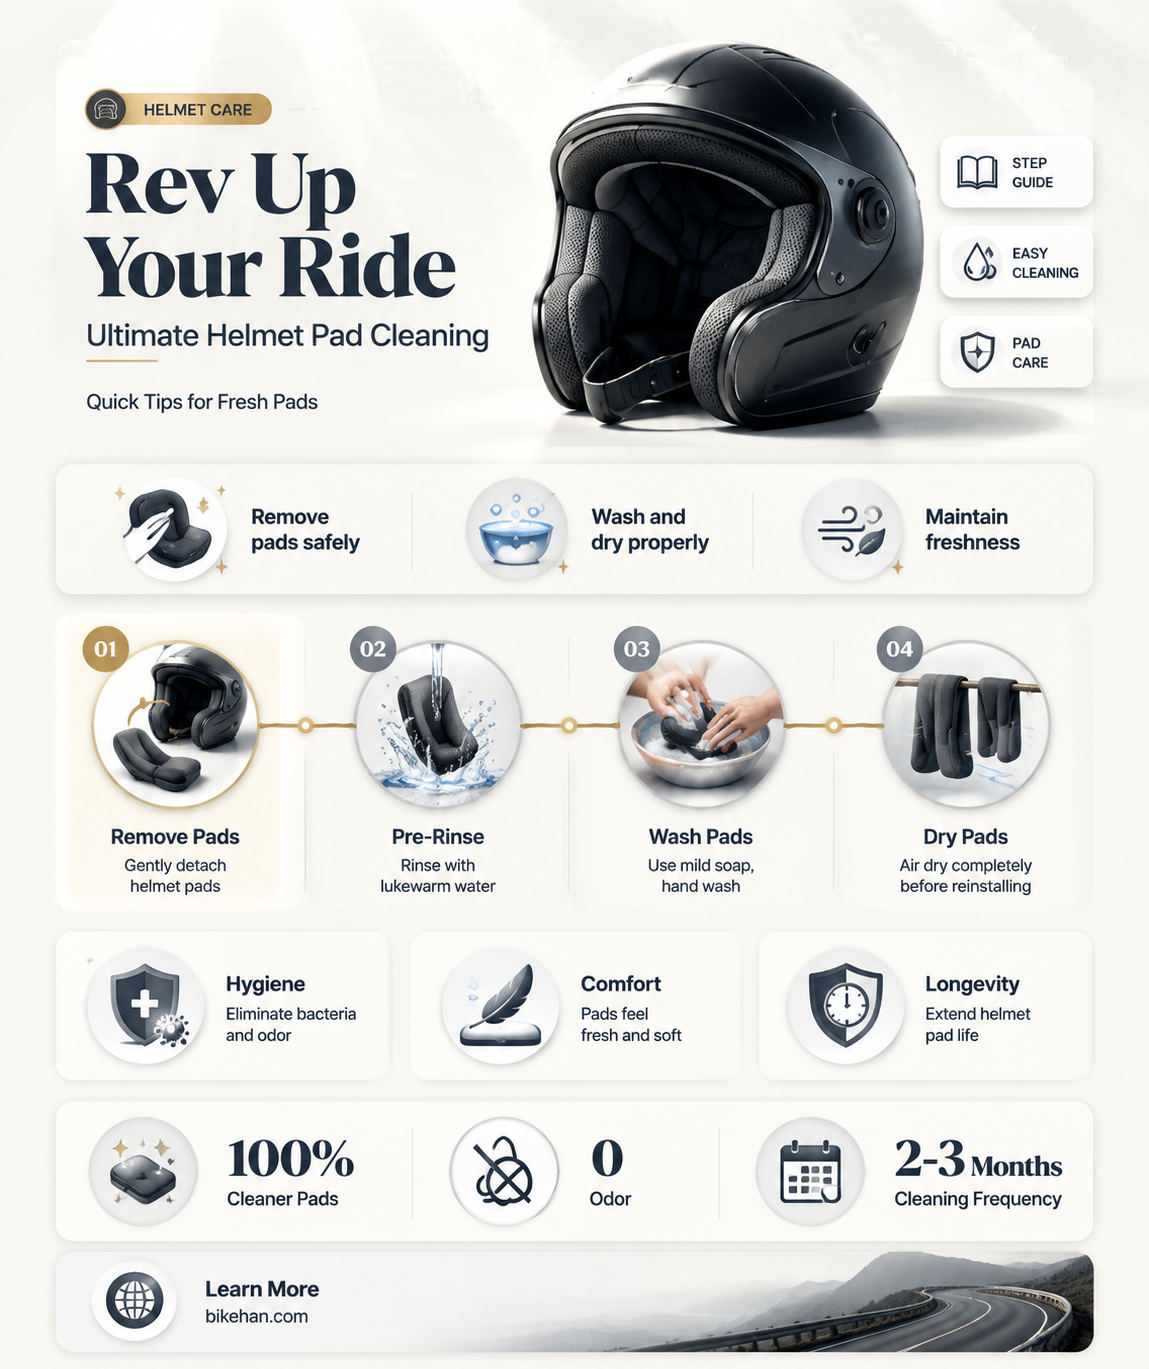
Cleaning motorcycle helmet pads is an essential part of maintaining your riding gear. Over time, these pads can accumulate sweat, dirt, and bacteria, which can lead to unpleasant odors and reduced effectiveness. Regular cleaning not only keeps your helmet fresh and hygienic but also ensures that the padding continues to provide optimal comfort and protection. In this guide, we'll walk you through the steps to properly clean your motorcycle helmet pads, covering the necessary supplies, techniques, and tips to make the process quick and easy. By following these instructions, you can keep your helmet in top condition and enjoy a safer, more comfortable riding experience.
Explore related products


What You'll Learn
- Removing Pads: Gently detach helmet pads using provided clips or Velcro for cleaning
- Spot Cleaning: Use a damp cloth with mild soap to clean surface dirt and stains
- Deep Cleaning: Soak pads in warm, soapy water, then scrub gently with a soft brush
- Drying Pads: Air dry pads away from direct sunlight to prevent damage
- Reinstalling Pads: Ensure pads are completely dry, then reattach securely to helmet

Removing Pads: Gently detach helmet pads using provided clips or Velcro for cleaning
Begin by locating the clips or Velcro straps that secure the helmet pads in place. These are typically found on the sides or back of the helmet, designed to allow easy removal and attachment. Gently press or slide the clips to release them, or carefully peel back the Velcro straps to detach the pads. Be cautious not to damage the clips or Velcro during this process, as they are essential for reattaching the pads securely after cleaning.
Once the pads are detached, inspect them for any signs of wear or damage. If the pads are excessively worn, frayed, or have lost their cushioning properties, it may be necessary to replace them entirely. For pads that are still in good condition, proceed with the cleaning process as outlined in the previous sections.
When reattaching the pads, ensure that they are properly aligned and securely fastened. For clip-on pads, press firmly until you hear a click, indicating that the clips have locked into place. For Velcro straps, press down evenly along the entire length of the strap to ensure a strong bond. After reattachment, give the helmet a gentle shake to confirm that the pads are securely in place and do not shift or move excessively.
Regularly inspecting and maintaining your helmet pads is crucial for ensuring the safety and comfort of your motorcycle helmet. By following these steps for removing and reattaching your helmet pads, you can keep your gear clean, functional, and ready for your next ride.
Florida Motorcycle Helmet Laws: What You Need to Know
You may want to see also
Explore related products


Spot Cleaning: Use a damp cloth with mild soap to clean surface dirt and stains
For spot cleaning motorcycle helmet pads, a damp cloth with mild soap is often sufficient to remove surface dirt and stains. This method is particularly effective for treating small, localized areas of grime or discoloration without having to clean the entire pad. When using this technique, it's important to gently dab the affected area rather than scrubbing vigorously, as this can damage the fabric or padding of the helmet pad.
One practical tip is to use a microfiber cloth, which is less likely to leave lint or scratches on the surface of the pad. Additionally, avoid using harsh chemicals or bleach, as these can weaken the materials or cause discoloration. If the stain is particularly stubborn, you may want to let the soapy solution sit for a few minutes before gently rinsing it away with a clean, damp cloth.
It's also important to consider the type of stain you're dealing with, as different stains may require different approaches. For example, oil-based stains may be more effectively treated with a degreaser or a mixture of baking soda and water, while ink stains may require a specialized ink remover. Always test any cleaning solution on a small, inconspicuous area of the pad first to ensure it doesn't cause any damage or discoloration.
After spot cleaning, allow the helmet pad to air dry completely before reinstalling it in the helmet. This will help prevent the growth of mold or mildew, which can be both unpleasant and potentially harmful. If the pad is particularly thick or has a lot of fabric, you may want to use a fan or a hair dryer on a low setting to speed up the drying process.
In summary, spot cleaning motorcycle helmet pads with a damp cloth and mild soap is a simple and effective way to maintain their cleanliness and appearance. By using gentle cleaning methods and avoiding harsh chemicals, you can keep your helmet pads in good condition for years to come.
Exploring the Legality of Motorcycle Helmet Covers: A Comprehensive Guide
You may want to see also
Explore related products


Deep Cleaning: Soak pads in warm, soapy water, then scrub gently with a soft brush
To deep clean motorcycle helmet pads, begin by preparing a solution of warm, soapy water. The ideal temperature for the water is around 30-40 degrees Celsius (86-104 degrees Fahrenheit), as this helps to loosen dirt and grime without damaging the pads. Use a mild detergent that is suitable for delicate fabrics, and avoid using bleach or other harsh chemicals that could degrade the materials.
Once the solution is ready, submerge the helmet pads completely and allow them to soak for 15-20 minutes. This will give the soap time to penetrate the fabric and break down any stubborn stains or odors. After soaking, gently agitate the pads in the water to help dislodge any remaining dirt.
Next, remove the pads from the water and gently scrub them with a soft-bristled brush. Be careful not to use too much force, as this could damage the fabric or cause the pads to lose their shape. Pay special attention to any areas with heavy staining or buildup, and use a circular motion to help lift the dirt away from the fabric.
Rinse the pads thoroughly with clean, cool water to remove all traces of soap and dirt. You can also use a mild fabric softener in the rinse water to help maintain the pads' softness and comfort. After rinsing, gently squeeze out any excess water and allow the pads to air dry completely before reinstalling them in the helmet.
It's important to note that deep cleaning should only be done occasionally, as frequent washing can damage the pads and reduce their effectiveness. For regular maintenance, it's best to spot clean the pads as needed and use a fabric refresher to keep them smelling fresh. By following these steps, you can keep your motorcycle helmet pads clean, comfortable, and safe for riding.
Top Spots for Scoring the Perfect Helmet: A Buyer's Guide
You may want to see also
Explore related products




Drying Pads: Air dry pads away from direct sunlight to prevent damage
After thoroughly cleaning your motorcycle helmet pads, it's crucial to dry them properly to maintain their integrity and effectiveness. Air drying is the recommended method, but it's important to do so away from direct sunlight to prevent damage. Direct sunlight can cause the materials in the pads to degrade, leading to a loss of cushioning and protection. Instead, find a well-ventilated area, such as a garage or a covered patio, where the pads can dry naturally without being exposed to harsh sunlight.
When air drying, it's essential to ensure that the pads are not bunched up or overlapping, as this can trap moisture and lead to mildew or odor. Lay the pads out flat, allowing air to circulate freely around them. Depending on the climate and humidity levels, it may take several hours to a full day for the pads to dry completely. Be patient and avoid using any artificial heat sources, such as a hairdryer or a heater, as these can also damage the materials.
If you're in a hurry and need to speed up the drying process, you can use a clean, dry towel to gently blot the pads, removing any excess moisture. However, be careful not to rub the pads too vigorously, as this can cause the materials to fray or tear. Once the pads are dry, inspect them for any signs of damage or wear, and replace them if necessary.
Properly drying your motorcycle helmet pads is an essential step in maintaining their performance and longevity. By air drying them away from direct sunlight, you can ensure that they remain in good condition and continue to provide the necessary protection for your head. Remember, safety should always be your top priority when riding a motorcycle, and taking care of your helmet pads is an important part of that.
Decoding the Mystery: What Does a Motorcycle Helmet on the Ground Mean?
You may want to see also
Explore related products


Reinstalling Pads: Ensure pads are completely dry, then reattach securely to helmet
Before reinstalling the pads, it's crucial to ensure they are completely dry. Moisture can compromise the adhesive and lead to the pads detaching while riding. To speed up the drying process, you can place the pads in a well-ventilated area or use a soft cloth to gently pat them dry. Avoid using heat sources like hairdryers, as excessive heat can damage the adhesive or the pads themselves.
Once the pads are dry, inspect them for any signs of wear or damage. If the adhesive backing appears to be compromised or if the pads show significant wear, it may be necessary to replace them. When reattaching the pads, start by aligning them with the corresponding slots or adhesive areas on the helmet. Press down firmly and evenly to ensure a secure fit.
For added security, some riders prefer to use additional adhesive or double-sided tape to reattach the pads. If you choose this method, be sure to clean the surface of the helmet and the pads thoroughly before applying the new adhesive. Allow the adhesive to set for the recommended time before reattaching the pads.
After reinstalling the pads, it's a good idea to test their security by gently pulling on them. If they come loose easily, you may need to reapply adhesive or consider replacing the pads. Regularly checking and maintaining the pads is essential for ensuring the safety and comfort of your helmet.
Remember, proper care and maintenance of your helmet pads can extend their lifespan and ensure they continue to provide the necessary protection and comfort. By following these steps, you can keep your helmet in top condition and enjoy a safer riding experience.
Illinois Motorcycle Helmet Law: What You Need to Know
You may want to see also
Frequently asked questions
It's recommended to clean your motorcycle helmet pads at least once a month, or more frequently if you ride in dusty or wet conditions. Regular cleaning helps maintain hygiene and ensures the longevity of the pads.
The best way to remove dirt and grime from helmet pads is to use a soft brush or cloth to gently scrub the surface. For tougher stains, you can use a mild detergent mixed with warm water. Be sure to rinse the pads thoroughly and allow them to air dry completely before reinstalling.
It's generally not recommended to machine wash motorcycle helmet pads, as this can damage the delicate materials and compromise their protective qualities. Hand washing is the safest and most effective method for cleaning helmet pads.
To deodorize your helmet pads, you can use a fabric deodorizer or a mixture of baking soda and water. Sprinkle the deodorizer on the pads and let it sit for a few hours before brushing it off. Alternatively, you can use a diluted solution of vinegar and water to help neutralize odors.